[phpBB Debug] PHP Warning: in file [ROOT]/includes/bbcode.php on line 483: preg_replace(): The /e modifier is no longer supported, use preg_replace_callback instead
[phpBB Debug] PHP Warning: in file [ROOT]/includes/bbcode.php on line 483: preg_replace(): The /e modifier is no longer supported, use preg_replace_callback instead
[phpBB Debug] PHP Warning: in file [ROOT]/includes/bbcode.php on line 483: preg_replace(): The /e modifier is no longer supported, use preg_replace_callback instead
[phpBB Debug] PHP Warning: in file [ROOT]/includes/bbcode.php on line 483: preg_replace(): The /e modifier is no longer supported, use preg_replace_callback instead
[phpBB Debug] PHP Warning: in file [ROOT]/includes/bbcode.php on line 483: preg_replace(): The /e modifier is no longer supported, use preg_replace_callback instead
[phpBB Debug] PHP Warning: in file [ROOT]/includes/bbcode.php on line 483: preg_replace(): The /e modifier is no longer supported, use preg_replace_callback instead
[phpBB Debug] PHP Warning: in file [ROOT]/includes/bbcode.php on line 483: preg_replace(): The /e modifier is no longer supported, use preg_replace_callback instead
[phpBB Debug] PHP Warning: in file [ROOT]/includes/bbcode.php on line 483: preg_replace(): The /e modifier is no longer supported, use preg_replace_callback instead
[phpBB Debug] PHP Warning: in file [ROOT]/includes/bbcode.php on line 483: preg_replace(): The /e modifier is no longer supported, use preg_replace_callback instead
[phpBB Debug] PHP Warning: in file [ROOT]/includes/bbcode.php on line 483: preg_replace(): The /e modifier is no longer supported, use preg_replace_callback instead
[phpBB Debug] PHP Warning: in file [ROOT]/includes/bbcode.php on line 483: preg_replace(): The /e modifier is no longer supported, use preg_replace_callback instead
[phpBB Debug] PHP Warning: in file [ROOT]/includes/bbcode.php on line 483: preg_replace(): The /e modifier is no longer supported, use preg_replace_callback instead
[phpBB Debug] PHP Warning: in file [ROOT]/includes/bbcode.php on line 483: preg_replace(): The /e modifier is no longer supported, use preg_replace_callback instead
[phpBB Debug] PHP Warning: in file [ROOT]/includes/bbcode.php on line 483: preg_replace(): The /e modifier is no longer supported, use preg_replace_callback instead
[phpBB Debug] PHP Warning: in file [ROOT]/includes/bbcode.php on line 483: preg_replace(): The /e modifier is no longer supported, use preg_replace_callback instead
[phpBB Debug] PHP Warning: in file [ROOT]/includes/bbcode.php on line 483: preg_replace(): The /e modifier is no longer supported, use preg_replace_callback instead
[phpBB Debug] PHP Warning: in file [ROOT]/includes/bbcode.php on line 483: preg_replace(): The /e modifier is no longer supported, use preg_replace_callback instead
[phpBB Debug] PHP Warning: in file [ROOT]/includes/bbcode.php on line 483: preg_replace(): The /e modifier is no longer supported, use preg_replace_callback instead
[phpBB Debug] PHP Warning: in file [ROOT]/includes/bbcode.php on line 483: preg_replace(): The /e modifier is no longer supported, use preg_replace_callback instead
[phpBB Debug] PHP Warning: in file [ROOT]/includes/bbcode.php on line 483: preg_replace(): The /e modifier is no longer supported, use preg_replace_callback instead
[phpBB Debug] PHP Warning: in file [ROOT]/includes/bbcode.php on line 483: preg_replace(): The /e modifier is no longer supported, use preg_replace_callback instead
[phpBB Debug] PHP Warning: in file [ROOT]/includes/bbcode.php on line 483: preg_replace(): The /e modifier is no longer supported, use preg_replace_callback instead
[phpBB Debug] PHP Warning: in file [ROOT]/includes/bbcode.php on line 483: preg_replace(): The /e modifier is no longer supported, use preg_replace_callback instead
[phpBB Debug] PHP Warning: in file [ROOT]/includes/bbcode.php on line 483: preg_replace(): The /e modifier is no longer supported, use preg_replace_callback instead
[phpBB Debug] PHP Warning: in file [ROOT]/includes/bbcode.php on line 483: preg_replace(): The /e modifier is no longer supported, use preg_replace_callback instead
[phpBB Debug] PHP Warning: in file [ROOT]/includes/bbcode.php on line 483: preg_replace(): The /e modifier is no longer supported, use preg_replace_callback instead
[phpBB Debug] PHP Warning: in file [ROOT]/includes/functions_mod_mdbanner.php on line 38: getimagesize(http://www.stockphotothailand.com/forums/images/banner/MainBannerShutterstock922.jpg): failed to open stream: HTTP request failed! HTTP/1.1 403 Forbidden
[phpBB Debug] PHP Warning: in file [ROOT]/includes/functions_mod_mdbanner.php on line 38: getimagesize(http://www.stockphotothailand.com/forums/images/banner/Dreamstime.jpg): failed to open stream: HTTP request failed! HTTP/1.1 403 Forbidden
[phpBB Debug] PHP Warning: in file [ROOT]/includes/functions_mod_mdbanner.php on line 38: getimagesize(http://www.stockphotothailand.com/forums/images/banner/Depositphotos.jpg): failed to open stream: HTTP request failed! HTTP/1.1 403 Forbidden
[phpBB Debug] PHP Warning: in file [ROOT]/includes/functions_mod_mdbanner.php on line 38: getimagesize(http://www.stockphotothailand.com/images/banners/BookAD-520-300.jpg): failed to open stream: HTTP request failed! HTTP/1.1 403 Forbidden
[phpBB Debug] PHP Warning: in file [ROOT]/includes/functions_mod_mdbanner.php on line 38: getimagesize(http://www.stockphotothailand.com/images/Stories/BannerWebboad/Freepik.jpg): failed to open stream: HTTP request failed! HTTP/1.1 403 Forbidden
[phpBB Debug] PHP Warning: in file [ROOT]/includes/functions_mod_mdbanner.php on line 38: getimagesize(http://www.stockphotothailand.com/images/%E0%B8%A1%E0%B8%AD%E0%B9%83%E0%B8%AB%E0%B8%A1%E0%B8%88%E0%B8%B0%E0%B9%84%E0%B8%9B%E0%B9%84%E0%B8%A7.png): failed to open stream: HTTP request failed! HTTP/1.1 403 Forbidden
[phpBB Debug] PHP Warning: in file [ROOT]/includes/functions_mod_mdbanner.php on line 38: getimagesize(http://www.stockphotothailand.com/images/%E0%B9%80%E0%B8%A3%E0%B8%A1%E0%B8%95%E0%B8%99%E0%B9%83%E0%B8%AB%E0%B8%A1%E0%B9%84%E0%B8%9B%E0%B9%80%E0%B8%A3%E0%B8%A72.png): failed to open stream: HTTP request failed! HTTP/1.1 403 Forbidden
[phpBB Debug] PHP Warning: in file [ROOT]/includes/functions.php on line 4752: Cannot modify header information - headers already sent by (output started at [ROOT]/includes/functions.php:3823)
[phpBB Debug] PHP Warning: in file [ROOT]/includes/functions.php on line 4754: Cannot modify header information - headers already sent by (output started at [ROOT]/includes/functions.php:3823)
[phpBB Debug] PHP Warning: in file [ROOT]/includes/functions.php on line 4755: Cannot modify header information - headers already sent by (output started at [ROOT]/includes/functions.php:3823)
[phpBB Debug] PHP Warning: in file [ROOT]/includes/functions.php on line 4756: Cannot modify header information - headers already sent by (output started at [ROOT]/includes/functions.php:3823)
Stockphotothailand ชุมชนคนขายภาพออนไลน์ เพื่อคนขายภาพถ่าย ภาพเว็คเตอร์ คลิปวิดีโอ ออนไลน์ • แสดงกระทู้ - การแต่งภาพที่ผ่าน ist.ทั้ง 3 ภาพ

การแต่งภาพที่ผ่าน ist.ทั้ง 3 ภาพ

บอร์ดนี้สำหรับเพื่อน ๆ ที่มีเทคนิค หรือแนวคิดต่าง ๆ ในการถ่ายภาพสต็อกอยากแบ่งปันหรือนำเสนอให้สมาชิกท่านอื่น ๆ ได้รับชมและนำไปประยุกต์ใช้ถ่ายภาพสต็อกต่อไป ไม่จำเป็นต้องเป็นเทคนิคระดับเทพ หรือแนวความคิดแบบหลุดโลก แม้เป็นอะไรที่เรียบง่ายและธรรมดาสุด ๆ แต่ถ้ามันเป็นเทคนิคหรือแนวความคิดที่ทำให้เกิดเป็นภาพสต็อกที่มีคุณภาพและเนื้อหาตามวัตถุประสงค์ก็ถือว่าใช้ได้ เชิญแบ่งปันและแลกเปลี่ยนกันได้เต็มที่ครับ*** กรุณางดการลงลิ้งก์ Affiliate และ Referral ทุกชนิดในเนื้อหากระทู้และลายเซ็น ลงลิ้งก์ได้เฉพาะ Portfolio หรือ Gallery สำหรับโชว์ผลงานในไมโครสต็อก และลิ้งก์ไปยังเว็บไซต์หรือบล็อกต่างๆ ที่เกี่ยวข้องกับการถ่ายภาพและขายภาพเท่านั้น ***
กฎการใช้บอร์ด
*** กรุณางดการลงลิ้งก์ Affiliate และ Referral ทุกชนิดในเนื้อหากระทู้และลายเซ็น ลงลิ้งก์ได้เฉพาะ Portfolio หรือ Gallery สำหรับโชว์ผลงานในไมโครสต็อก และลิ้งก์ไปยังเว็บไซต์หรือบล็อกต่างๆ ที่เกี่ยวข้องกับการถ่ายภาพและขายภาพเท่านั้น ***

การแต่งภาพที่ผ่าน ist.ทั้ง 3 ภาพ

โพสต์โดย oldman » 03 ต.ค. 2013 16:32

ก่อนอิ่นต้องบอกตรงๆว่าไม่คิดว่าจะสอบผ่านครั้งนี้ ไครมีอะไรแนะนำเพิ่มเติมก็เชิญเต็มที่ครับ เมื่อผ่านแล้วก็เอามาฝากกัน ทั้ง 3 ภาพผมต้องดึง Histogram ดูเพราะจอผมจืดสนิด(11 ปี)ไม่สามารถ Calibrate ได้อีกแล้ว ตามนี้ครับ

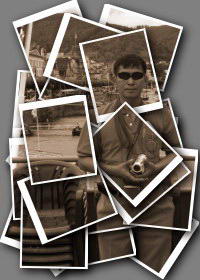
ภาพที่ 1/3 ภาพนี้ไม่ได้ปรับอะไรมากเพียงปิดช่องแสงที่เงาดำด้านบน เน้นแสงกับแบบแค่สองอย่าง ใช้โฟโต้ชอพเร่งประกายนิดหน่อยผมชอบสายน้ำตรงท้ายไบพัดเรือ
112_resize.jpg
112_resize.jpg (129.95 KiB) เปิดดู 8459 ครั้ง
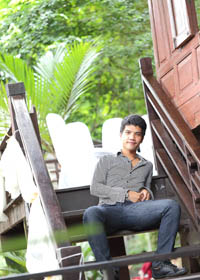

****************************************************************************
ภาพที่ 2/3
113_resize.jpg
113_resize.jpg (69.77 KiB) เปิดดู 8459 ครั้ง

เห็นภาพนี้แล้วก็ขำเพราะเป็นภาพที่ถ่ายลองกล้อง พอมาดูตอนที่เริ่มถ่ายเป็นมันพอดีเป๊ะ แต่ก็ทำหลายส่วน ...
- ฉากหลังเป็นลายจุดเกินไปกวนตัวแบบก็เลย Crop - Feather ห่างๆเพราะต้องการรักษาเส้นไรขนรอบตัวแล้วค่อยเบลอให้นุ่มตาหน่อย ส่วนขอบฟุตบาทไม่เอาออกเพราะต้องการให้นำสายตาไว้
- สันจมูกกับโคนหนวดไม่ค่อยชัดเพราะตั้งค่าชัดตื้นมากไปแต่อยากให้มันเด่นขึ้นมาก็เลย Crop ใส่ Feather เติม High pass ช่วยให้คมขึ้น
- ช่องปากกับหนวดที่ที่พาดลงมามีขอบม่วงและ Noise แต่ไม่มาก ผมใช้ Replace Color โดยขยายมา 200-500% ดูที่ละเม็ดที่ละโทน
- ปรับสี แสงให้ทึมๆไม่ให้เกินจริง

********************************************************************************

ภาพที่ 3/3 ภาพนี้ถ้าเป็นเชิงการตลาดก็ถือว่าตรงเป๊ะ แต่งเยอะเพราะถ่ายมามีทั้งเม็ดสี(Noise) ขอบม่วง ถุงกร๊อบแก๊บข้าวกลางวัน เชือกลวดห้อยรุงรัง แล้วก็ที่สำคัญเมฆลายทึมๆอยู่ด้านหลัง เลยตัดสินใจทำเป็นภาพ Isolated (ฉากหลังขาวหรือสีเดียว) ใช้เวลาครึ่งวันเสาร์กว่าจะเหมือนเนียน ภาพอาจจะดูสว่าง(Over) มากไปนิด แต่ก็เป็นแนวสะอาดที่เขาชอบ
114_resize.jpg
114_resize.jpg (85.79 KiB) เปิดดู 8459 ครั้ง

1. ทำ Isolated
1.1 Copy Layer ปรับแสงสีให้พอใจก่อนเพราะเมื่อไปไปทำอย่างอื่นแล้วจะได้ไม่ต้องปรับอีก(เด็ดขาด)
1.2 Crop ส่วนที่เป็นเสาแท่งปูนใส่ Feather ลอยไว้ก่อน ยังไม่ต้องทำอะไร
1.3 Color Range สีส้มลาก Scale ตามควร ใส่ Feather ซัก 1-3 แล้ว Copy วาง Layer ลอยไว้อีกอัน(ผมทำ Scale ไว้ 3 ระดับ 3Layer เลย ...กันเหนียวแล้วค่อยมาเลือเอาที่พอดี
1.4 Color Range สีท้องฟ้าลาก Scale กินลึกพอสมควรแต่ไม่ต้องหมดในทีเดียวอย่าให้มากเกินไปเดี๋ยวเหล็กเส้นรอบข้างเสาจะหายหรือจางเกินไป เคลียทีหลังได้ (ก่อนหน้านี้ผมทำ layer สีน้ำเงินรองล่างเพื่อไว้ดูรูรั่ว)พอได้ที่ก็สังเกตุภาพขยายให้ละเอียด ขั้นตอนนี้มีทั้ง Smooth เพื่อให้เส้นเนียนขึ้นแล้วค่อยมาเก็บมุมทีหลัง, Contract ถ้าดูว่าห่างไปต้องขยับเข้าไปหาเส้นโครงเหล็กเพื่อไม่ไห้มีรอยต่อของโทนสีขาวรอบโครงเหล็ก เมื่อได้ที่ก็รัวปุ่ม Del. เสร็จแล้วผมใส่ Strock เพื่อหาลบส่วนที่ต้องเก็บตก
1.5 Merge Layer 1.2 อาจปรับ Opacity บ้างตามควร, 1.3 และ 1.4
1.6 Copy layer(Duplicate)เอาขึ้นมาทำต่อ
1.7 ตอนนี้เรามี 3 Layer คือ 1.1 Original, 1.5 ตัดพื้นหลัง และ 1.6 เตรียมทำต่อ
2. Color Noise สูงมากตรงสันเสาด้านขวา
2.1 Color Range สีส้มลาก Scale ตามควร ใส่ Feather ซัก 1-3 แล้ว Copy วาง Layer ลอยไว้ ทำเพื่อต้องการรักษาโทนสีหลักเอาไว้ โชคดีที่ภาพนี้สีไม่ซับซ้อนมาก เวลา merge ตอนท้ายก็ปรับ Opacity ตามต้องการ ของผมใส่ Despeckle ลด Noise ที่ Layer นี้ด้วย)
2.2 Color Range สีพื้นคอนกรีตลาก Scale มากหน่อย ทำเพื่อรักษาสภาพที่เป็นจริงไว้ให้มากที่สุด ต้องดูนะครับพยายามอย่าให้มีสีของ Noise ติดมา
2.3 Color Range สีของ Noise ให้ + ไปเรื่อยๆ ลาก Scale ที่ละน้อย Copy ขึ้นมาแล้วปรับ Hue ให้ไกล้เคียงที่สุด และ/หรือ ปรับ Satulation ให้สีหายไป
2.5 เมื่อพอใจก็ Merge ซะ คราวนี้อาจจะทั้งจืดทั้งเบลอ ก็ใส่ High Pass แค่นิดหน่อยเพราะไม่ใช่ส่วนหลัก เดี๋ยวจะหลอกภาพ
3. สุดท้ายผมลบโลโก้ตรงผืนผ้าไบที่โปร่งหลัง, เก็บถุงกร๊อบแก๊บ, เศษเชือก, เศษลวด, ตัวหนังสือสีขาวที่พ่นติดโครงเหล็ก, และตำหนิที่เด่นชัดต่างๆก็เอาออกหรือทำให้จางลง
4. QC.ครั้งสุดท้ายตกลงใจแค่นี้พอ ก็เพิ่มอรรถประโยชน์ให้กับตัวสินค้าได้แล้ว
5. Note อ้อ ..ลืมไปครับ ผมทำ High Pass โดย Copy Layer - Filter - Other - High Pass ใช้ได้แค่ 0.5 - 1 ครับ มากกว่านั้นระวังโดนน็อค แล้วปรับ Layer ให้เป็น Overlay ลองปิด/เปิด Layer ดูความแตกต่าง ไครที่ภาพไม่ชัดอาจพอช่วยได้แค่นิดหน่อย ทางที่ดีทำตามที่อาจารย์สุระสอนครับ ชัดตั้งแต่ถ่ายจะได้ไม่ต้องยุ่งบากแบบผม
6. เล่าไม่รู้เรื่องหรือผิดพลาดขออภัยครับ
"memmore" on ...
-
-

Korn Rungrak ถูกใจโพสต์นี้
ภาพประจำตัวสมาชิก
oldman
สมาชิก 100 Posts +++
 
โพสต์: 137
รวมจำนวน Like ที่ให้ผู้อื่น: 17 โพสต์
รวมจำนวน Like ที่ได้รับ: 253 โพสต์
ลงทะเบียนเมื่อ: 23 ส.ค. 2013 15:35
ที่อยู่: บางโพ บางซื่อ กทม.

Re: การแต่งภาพที่ผ่าน ist.ทั้ง 3 ภาพ

โพสต์โดย myrainjom » 03 ต.ค. 2013 20:04

จดๆๆๆๆๆ ขอบคุณสำหรับน้ำใจในการแบ่งปันครับบบบ
รวยๆๆๆๆนะครับ :D :D :D
ภาพประจำตัวสมาชิก
myrainjom
สมาชิก 100 Posts +++
 
โพสต์: 294
รวมจำนวน Like ที่ให้ผู้อื่น: 0 โพสต์
รวมจำนวน Like ที่ได้รับ: 0 โพสต์
ลงทะเบียนเมื่อ: 27 มิ.ย. 2013 14:42

Re: การแต่งภาพที่ผ่าน ist.ทั้ง 3 ภาพ

โพสต์โดย samaleo » 25 ต.ค. 2013 07:35

เจ๋งไปเลย...ขอบคุณสำหรับเทคนิคที่นำมาฝากกันครับ แต่ถ้าเอาภาพต้นฉบับมาเทียบให้ดูจะชัดเจนมากครับ...
ภาพประจำตัวสมาชิก
samaleo
 
โพสต์: 32
รวมจำนวน Like ที่ให้ผู้อื่น: 0 โพสต์
รวมจำนวน Like ที่ได้รับ: 0 โพสต์
ลงทะเบียนเมื่อ: 03 ก.ย. 2013 09:48

Re: การแต่งภาพที่ผ่าน ist.ทั้ง 3 ภาพ

โพสต์โดย oldman » 25 ต.ค. 2013 15:32

ผมหาภาพแมวไม่เจอ ไว้กลับกรุงเทพจะไปค้นใน HD ดู ส่วนภาพแสงสะท้อนไม่ได้ปรับอะไรมากครับ
114.jpg
ภาพต้นฉบับครับ ถ่ายแย่มากจึงต้องแต่งเยอะ
114.jpg (163.52 KiB) เปิดดู 8239 ครั้ง

114_resize.jpg
114_resize.jpg (85.79 KiB) เปิดดู 8239 ครั้ง
"memmore" on ...
-
-
ภาพประจำตัวสมาชิก
oldman
สมาชิก 100 Posts +++
 
โพสต์: 137
รวมจำนวน Like ที่ให้ผู้อื่น: 17 โพสต์
รวมจำนวน Like ที่ได้รับ: 253 โพสต์
ลงทะเบียนเมื่อ: 23 ส.ค. 2013 15:35
ที่อยู่: บางโพ บางซื่อ กทม.

Re: การแต่งภาพที่ผ่าน ist.ทั้ง 3 ภาพ

โพสต์โดย samaleo » 27 ต.ค. 2013 21:22

เป็นผมต้องใช้เวลาทั้งวันแน่ๆกว่าจะเนียนได้ซักครึ่งของพี่ oldman ขอบคุณมากๆเลยครับสำหรับไอเดียดีๆ ขอให้ยอดพรุ่งกระฉูด..
ภาพประจำตัวสมาชิก
samaleo
 
โพสต์: 32
รวมจำนวน Like ที่ให้ผู้อื่น: 0 โพสต์
รวมจำนวน Like ที่ได้รับ: 0 โพสต์
ลงทะเบียนเมื่อ: 03 ก.ย. 2013 09:48

Re: การแต่งภาพที่ผ่าน ist.ทั้ง 3 ภาพ

โพสต์โดย peteep » 24 ส.ค. 2015 09:43

ขอบคุณครับ
peteep
 
โพสต์: 15
รวมจำนวน Like ที่ให้ผู้อื่น: 12 โพสต์
รวมจำนวน Like ที่ได้รับ: 1 โพสต์
ลงทะเบียนเมื่อ: 24 ส.ค. 2015 08:32

Re: การแต่งภาพที่ผ่าน ist.ทั้ง 3 ภาพ

โพสต์โดย Guiders » 25 ส.ค. 2016 13:52

ขอบคุณครับ
Guiders
 
โพสต์: 11
รวมจำนวน Like ที่ให้ผู้อื่น: 0 โพสต์
รวมจำนวน Like ที่ได้รับ: 0 โพสต์
ลงทะเบียนเมื่อ: 25 มิ.ย. 2016 17:05

Re: การแต่งภาพที่ผ่าน ist.ทั้ง 3 ภาพ

โพสต์โดย kong664852 » 17 ธ.ค. 2016 11:53

แต้งกิ้วว
kong664852
 
โพสต์: 3
รวมจำนวน Like ที่ให้ผู้อื่น: 0 โพสต์
รวมจำนวน Like ที่ได้รับ: 0 โพสต์
ลงทะเบียนเมื่อ: 17 ธ.ค. 2016 11:51


ย้อนกลับไปยัง ไอเดียบรรเจิด แบ่งปัน แลกเปลี่ยน Idea ในการถ่ายภาพสต็อกของคุณ

ผู้ใช้งานขณะนี้

กำลังดูบอร์ดนี้: ไม่มีสมาชิกใหม่ และ บุคคลทั่วไป 2 ท่าน